How to Make Serum Sound Analog: Minimoog Bass & Juno Pads from Scratch
Software can't perfectly replicate a real Minimoog or Juno-106. Analog circuits have quirks — thermal drift, component tolerances, happy accidents — that algorithms can approximate but not duplicate. That said, the techniques in this guide will get you close enough that most listeners won't know the difference. We're centering this guide around Xfer Serum because it's what we use and is the most used soft synth. But every technique here translates directly to Vital (free), your DAW's stock synths (i.e. Logic, Ableton, etc), or any other soft synth with similar architecture. The principles are universal; the knob names may change.
First, let's organize around the synths you might be using.
The Soft Synth Landscape (Quick Version)
Xfer Serum ($189, or $9.99/month rent-to-own via Splice) This is the industry standard. Wavetable-based, visually intuitive, massive preset ecosystem. Not designed for analog emulation, but with the right techniques, you can coax warmth out of it.
Vital (Free) Full-featured wavetable synth with 32 filter types, including analog-modeled options. The filters actually sound less digital than Serum's out of the box. If you don't own Serum, start here.
Stock Synths Worth Knowing
Logic Pro — Retro Synth: Analog mode does Moog-style subtractive synthesis surprisingly well.
Ableton Live — Drift: Built specifically for analog instability. The "Drift" knob adds per-voice pitch and tone variation automatically.
Pro Tools — Vacuum: Tube circuit modeling with built-in "Age" controls (Drift and Dust). Sounds dirty in the right way.
If you're working in a DAW, you already have tools that can do this. You don't need to buy anything.
How a Synth Actually Works
If you're coming from guitar and getting your feet wet with synth for the first time, the architecture can feel alien. Here's the short version — just enough to make sense of everything that follows. If you've been at it for a while, skip to the next section.
Oscillator - your root sound source - the equivalent of guitar strings vibrating. Oscillators generate raw waveforms — i.e. saw, square, triangle, or sine — each with a different harmonic character.
Filter - your tone knob, analogous to EQ. It removes frequencies from the oscillator's raw sound. Filters also have resonance, which boosts frequencies right at the cutoff point.
Envelope (ADSR) An envelope shapes how a parameter changes over time when you press and release a key. ADSR stands for:
Attack: How long it takes to reach full level after you press the key
Decay: How long it takes to drop from the peak to the sustain level
Sustain: The level it holds while you keep the key pressed
Release: How long it takes to fade to silence after you let go
Most synths have at least two envelopes: one controlling volume (amp envelope), one controlling the filter (filter envelope).
Short attack + short decay = plucky. Long attack = swells. The amp envelope on a guitar is essentially fixed by the instrument — on a synth, you design it.
4. LFO (Low-Frequency Oscillator) An LFO is an oscillator that's too slow to hear — instead of making sound, it wiggles other parameters. LFOs are how synths create movement and life in a sound.
Route an LFO to pitch and you get vibrato.
Route it to the filter and you get a wah-like sweep.
Route it to volume and you get tremolo.
In most subtractive, or East Coast/Moog-style synthesis (which includes Serum for our purposes), the signal flows like this:
Oscillator(s) → Filter → Envelope → Amplifier → Effects
The oscillator generates the raw tone. The filter shapes which frequencies survive. The amplifier controls overall volume (shaped by the amp envelope). Effects like reverb, delay, and chorus come last.
That's it. Everything else — mod matrices, wavetables, FM, voicing modes — is elaboration on this basic chain. If you understand oscillator → filter → amp, you can begin to navigate most synths.
How to Make Serum Sound Analog
Analog synths sound the way they do because of imperfections: oscillators that drift slightly out of tune, filters that saturate unpredictably, circuits that add harmonic content whether you want it or not. Digital synths much cleaner by default; they need the user to control or automate the different parameters.
Our job is to mess them up with intention.
1. Oscillator Drift
Analog oscillators drift 5-10 cents over time due to temperature changes and voltage fluctuations. Digital oscillators are locked to perfect pitch. That’s fine for some applications, but for emulating analog you’ll immediately find it sounds too sterile.
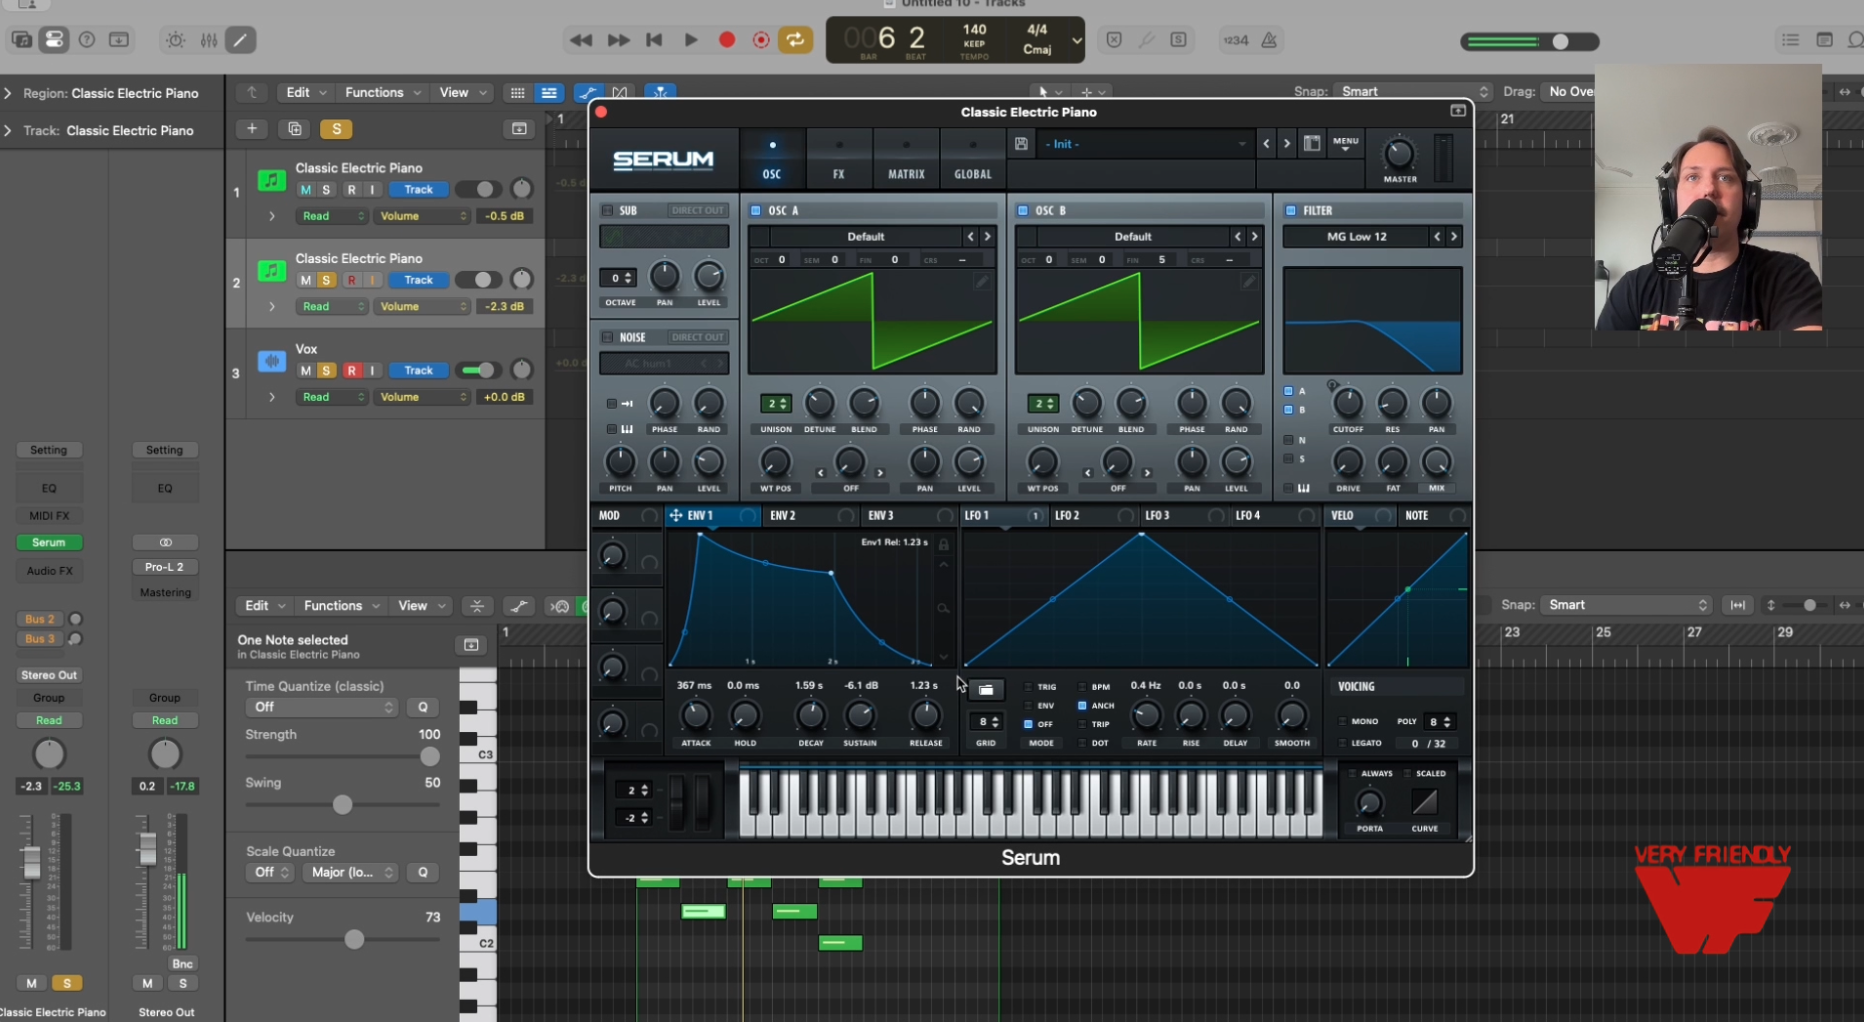
In Serum:
Start in the LFO table. Changing the shape of the oscillator (by clicking on the triangular line and dragging it around) changes the way the LFO will affect your other oscillator, filter, etc.
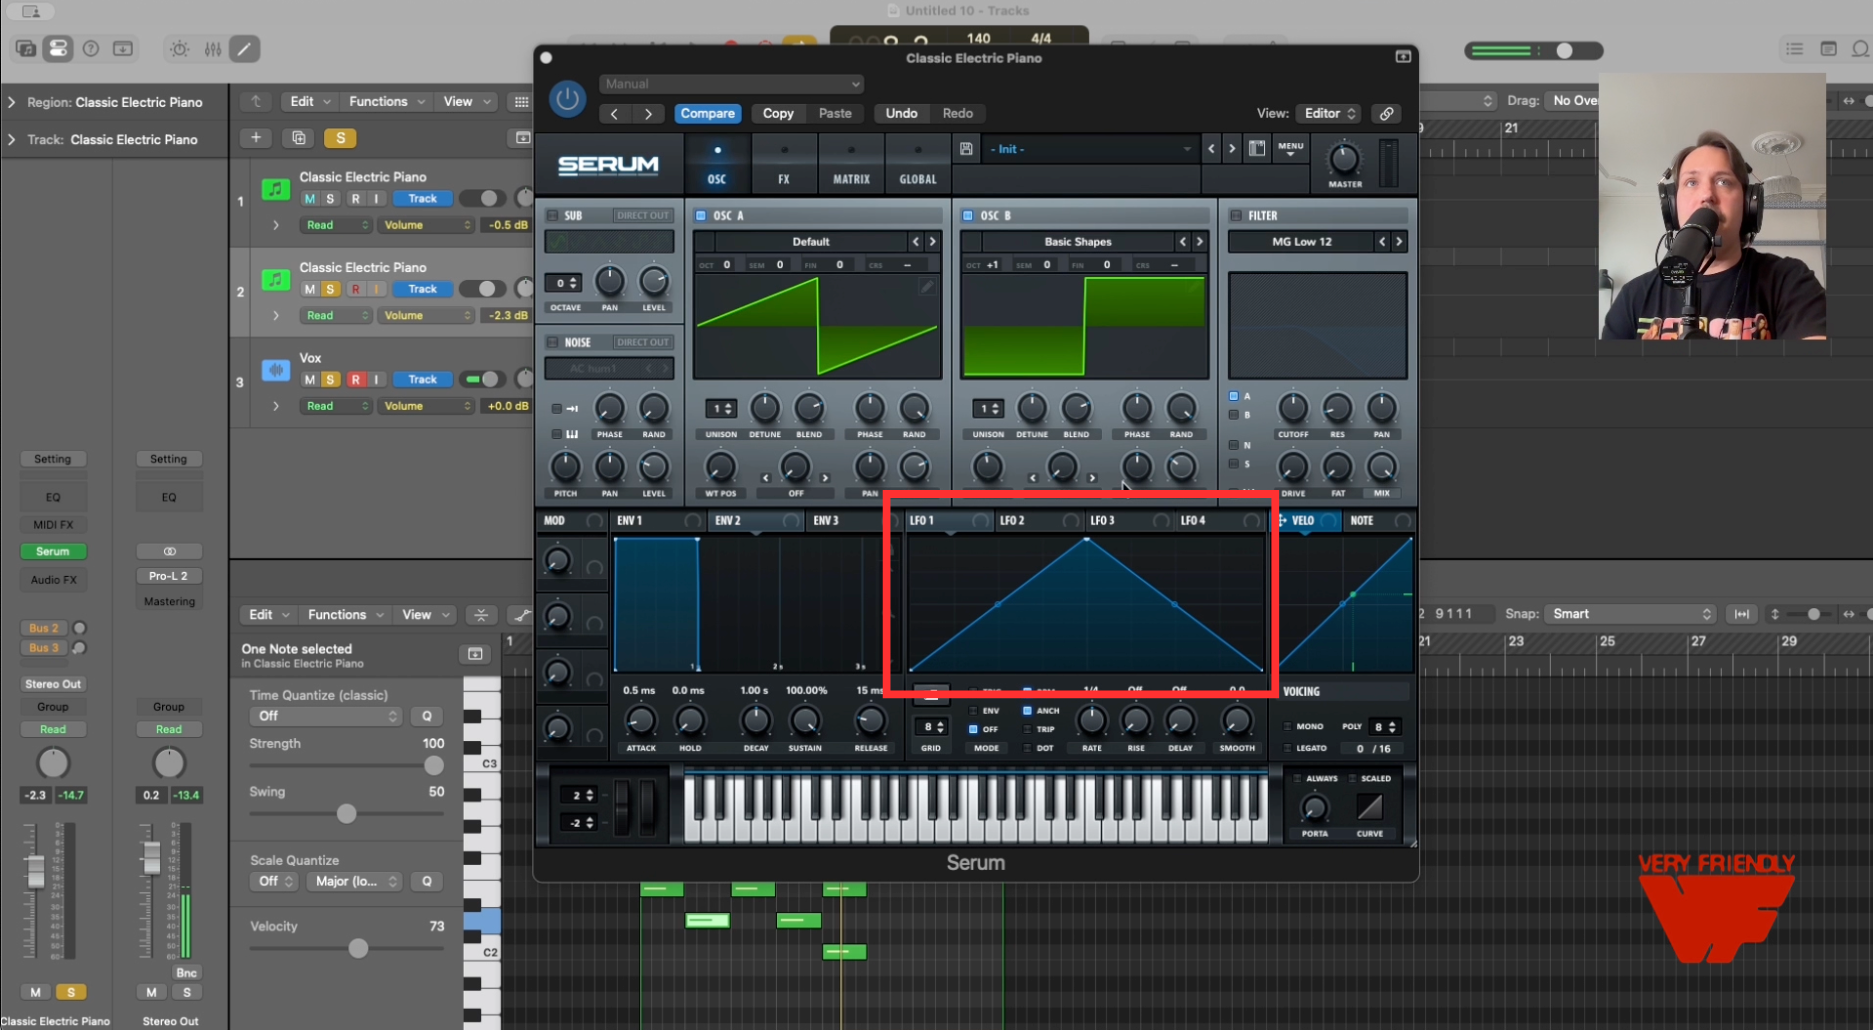
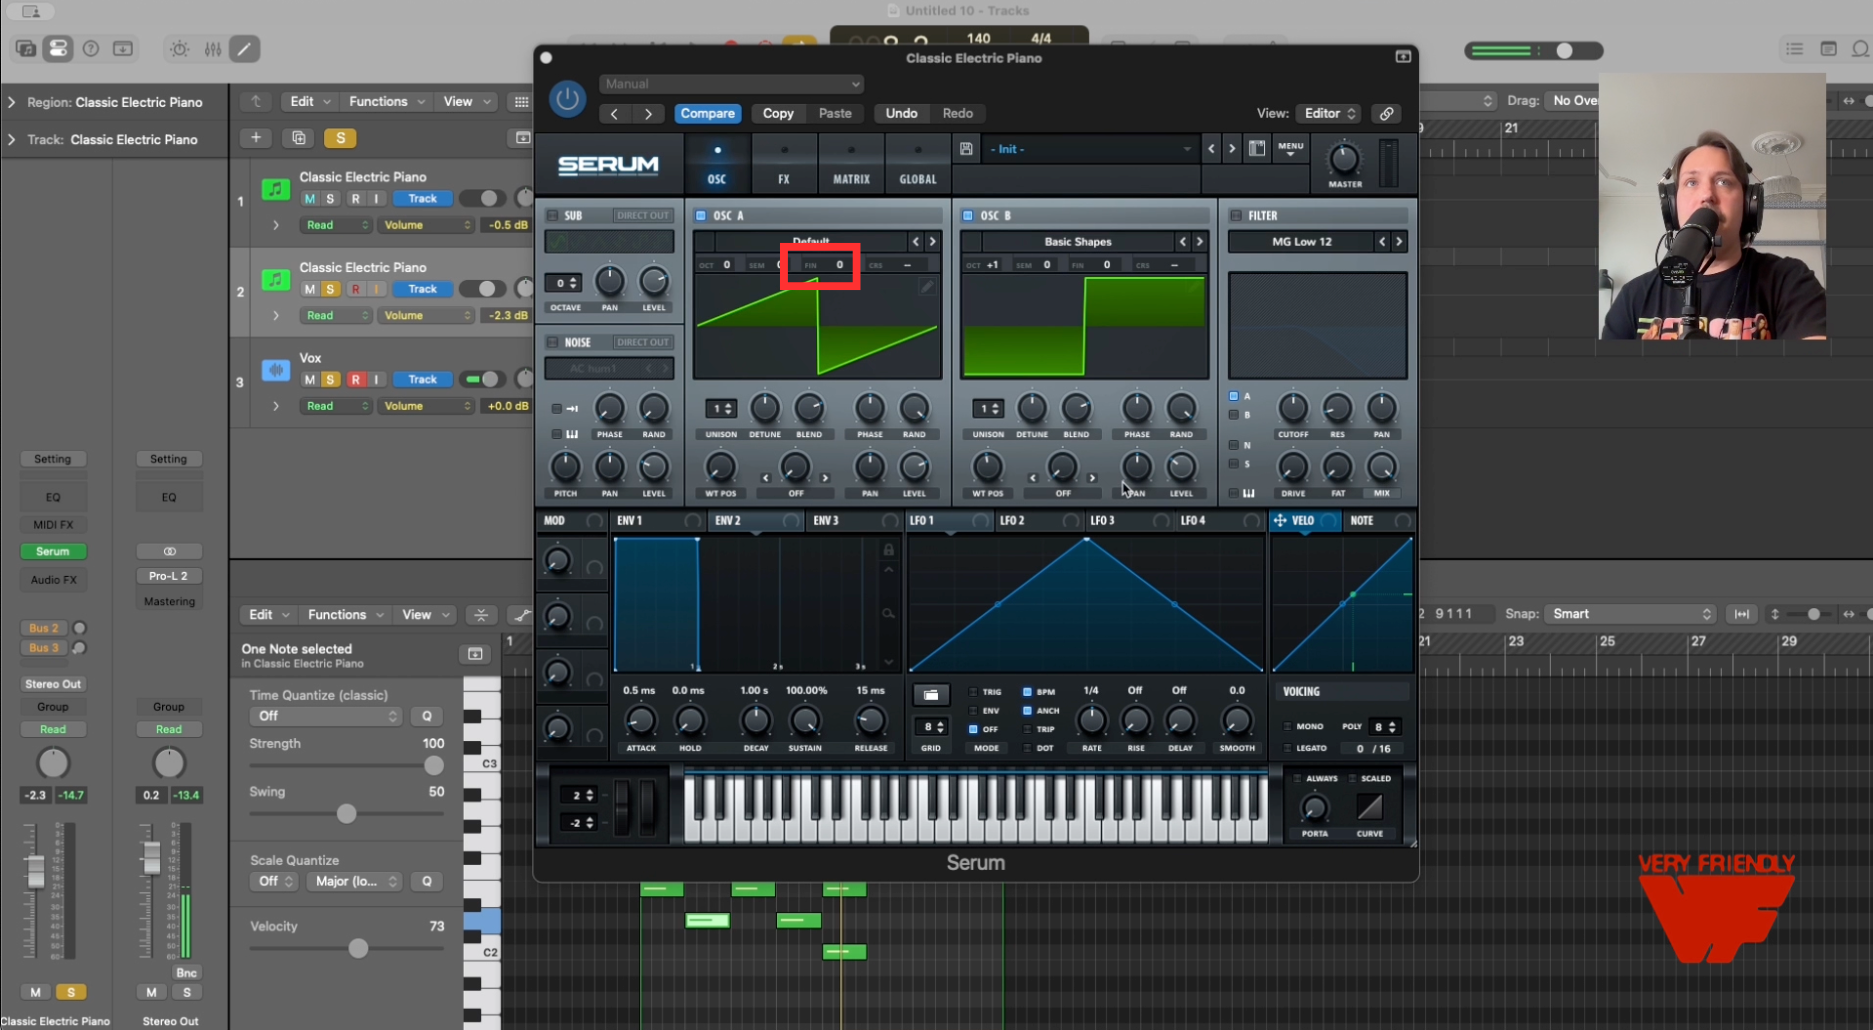
Click and drag the LFO (tab saying "LFO 1" in the image) onto the fine tuner of one of your oscillators (labeled "fin").
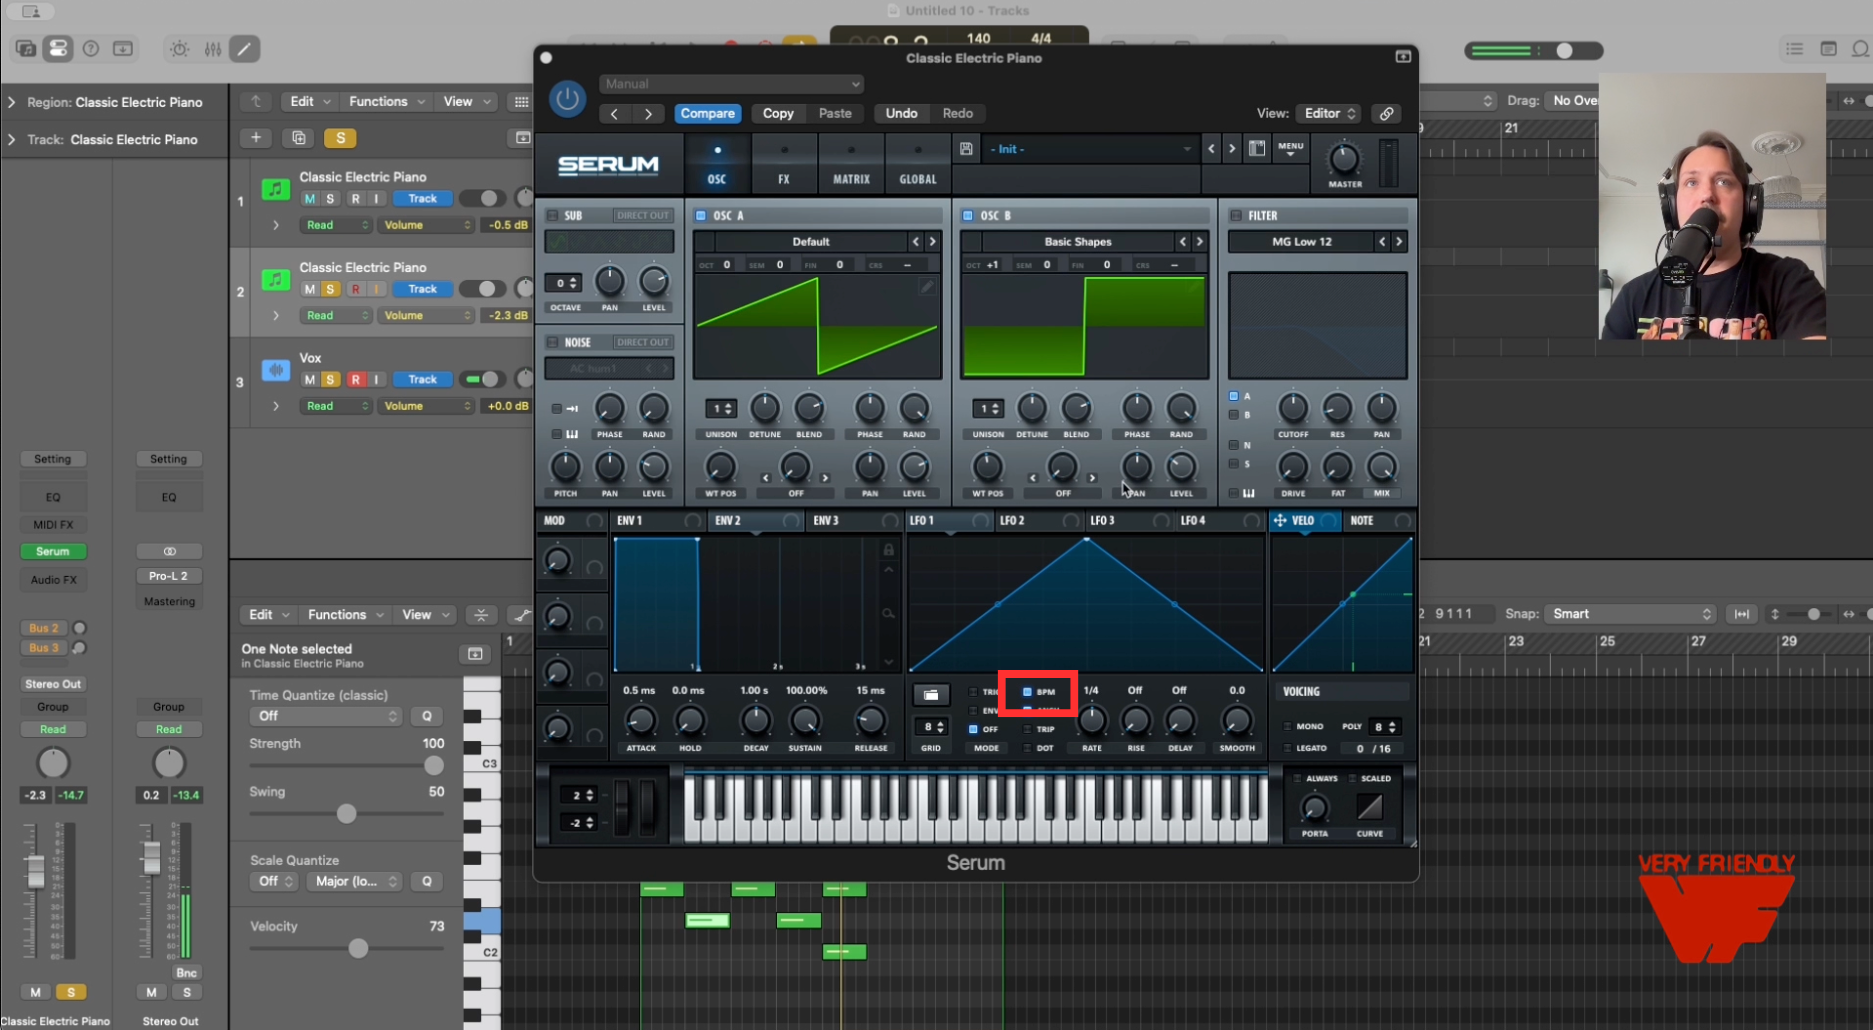
Set your LFO rate: uncheck "BPM" to change the measurement of your rate from BPM to Hertz, then dial in an extremely slow rate, i.e. 0.1–0.3 Hz
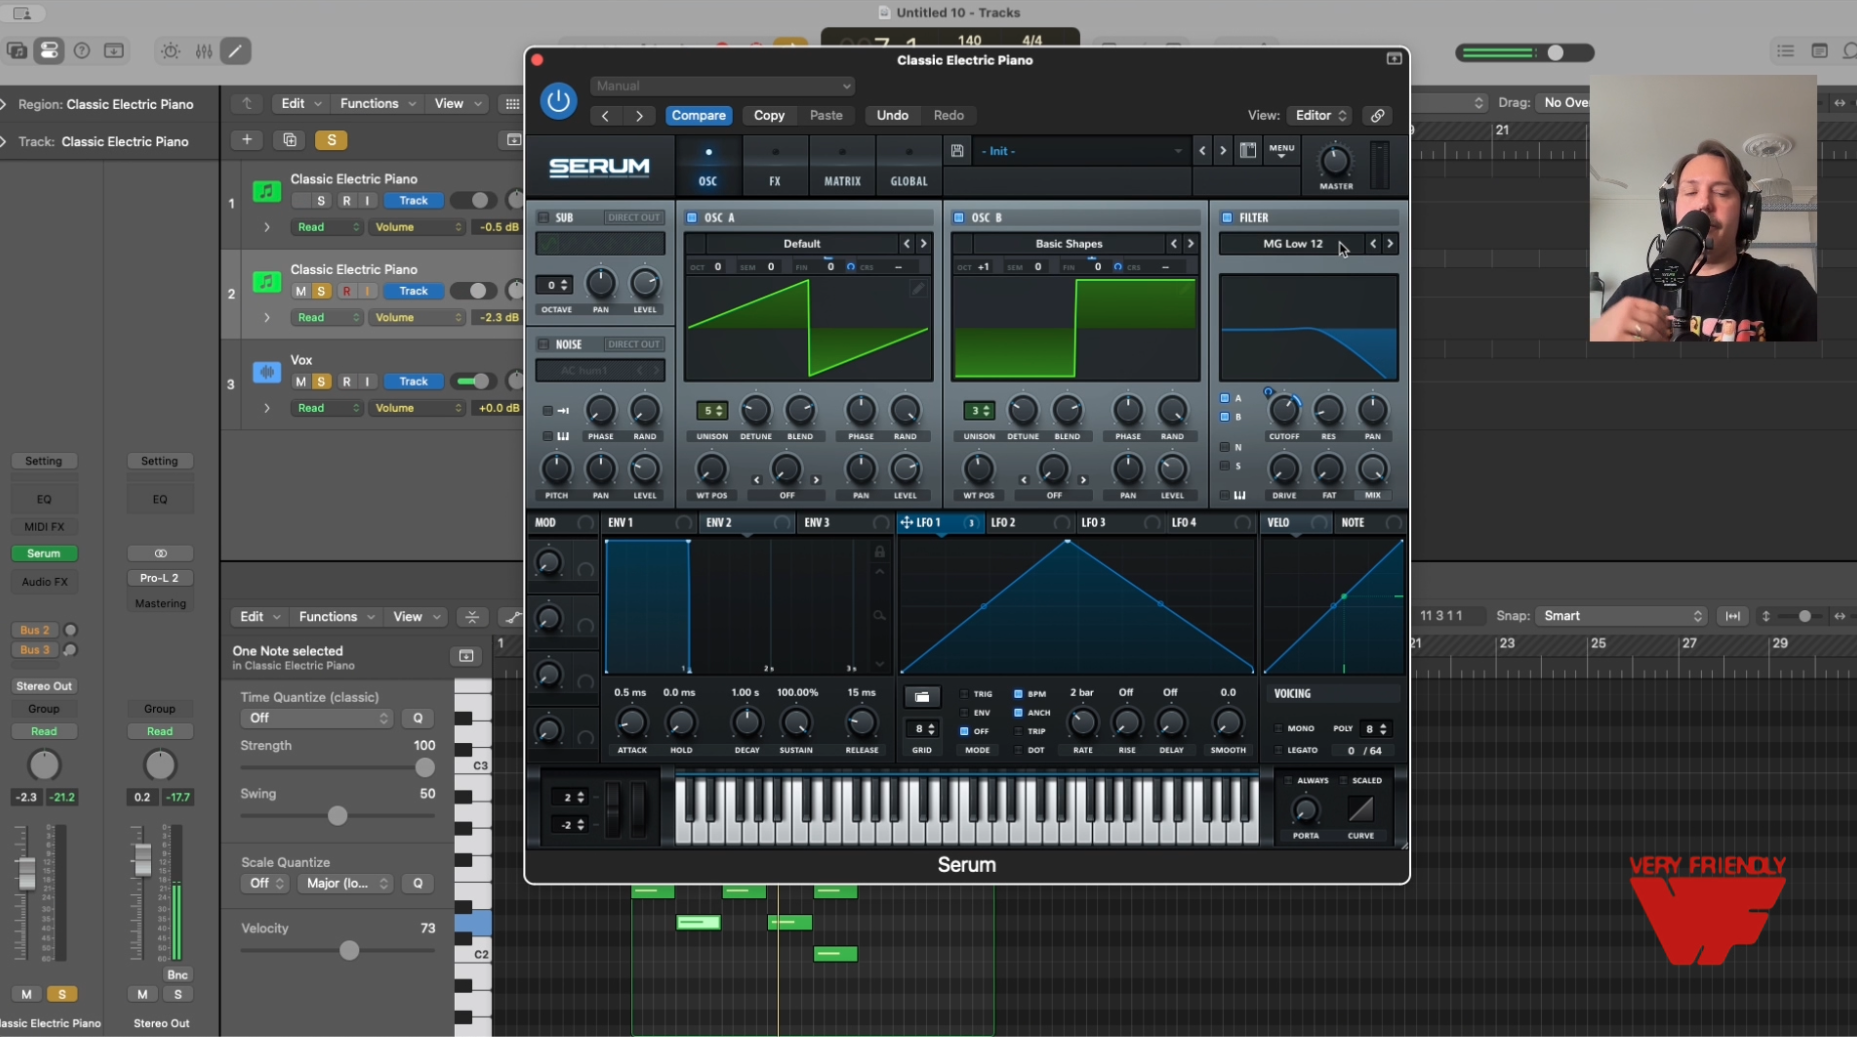
LFO shape: Sine - click on the folder below the LFO tray and select Sine
Amount: 1–8% - to dial this in, click on "fin" and drag your cursor up or down to change the number of cents up you want the LFO to shift your pitch up and down as you play. This is replicating the "analog wobble."
For extra movement, use Serum's "Note On Random" as a source in the mod matrix, targeting fine pitch. This randomizes tuning slightly on each new note.
2. Detuning
Two oscillators at identical pitch sound like one oscillator. Two oscillators slightly detuned sound fat.
Settings:
Subtle warmth: ±3–5 cents between Osc A and Osc B
Classic vintage character: +7 cents on Osc A, -7 cents on Osc B
Fat synthwave bass: +9 cents, with 3 unison voices at 15–18% detune
Stay under 99 cents total or you'll get dissonant beating instead of warmth.
In Serum:
Use the Fine Tune knob on each oscillator to add mild dissonance between your two oscillators
For unison detuning, increase the voice count and adjust the Detune knob in the oscillator section.

3. Filter Settings
The filter is where the analog character really lives. Vintage synths used specific filter architectures that behave differently under resonance.
For Moog-style bass:
Filter type: Low-pass 24dB (Serum's "MG Low 24" is modeled on Moog's ladder filter)
Resonance: 30–48%
Note: Moog filters lose low end as resonance increases — this is a feature, not a bug
For Juno-style pads:
Filter type: Low-pass 12dB (smoother, sits better in a mix)
Resonance: ~20%
Cutoff: Lower than you think — vintage recordings are duller than modern ones
General rule: Set your filter envelope release shorter than your amplitude envelope release. This lets you hear the full filter sweep before the note dies.
Pro tip: apply your LFO to the filter knob and create breath and movement.
4. Saturation
Pure digital waveforms lack harmonic complexity. Saturation adds it back.
In Serum:
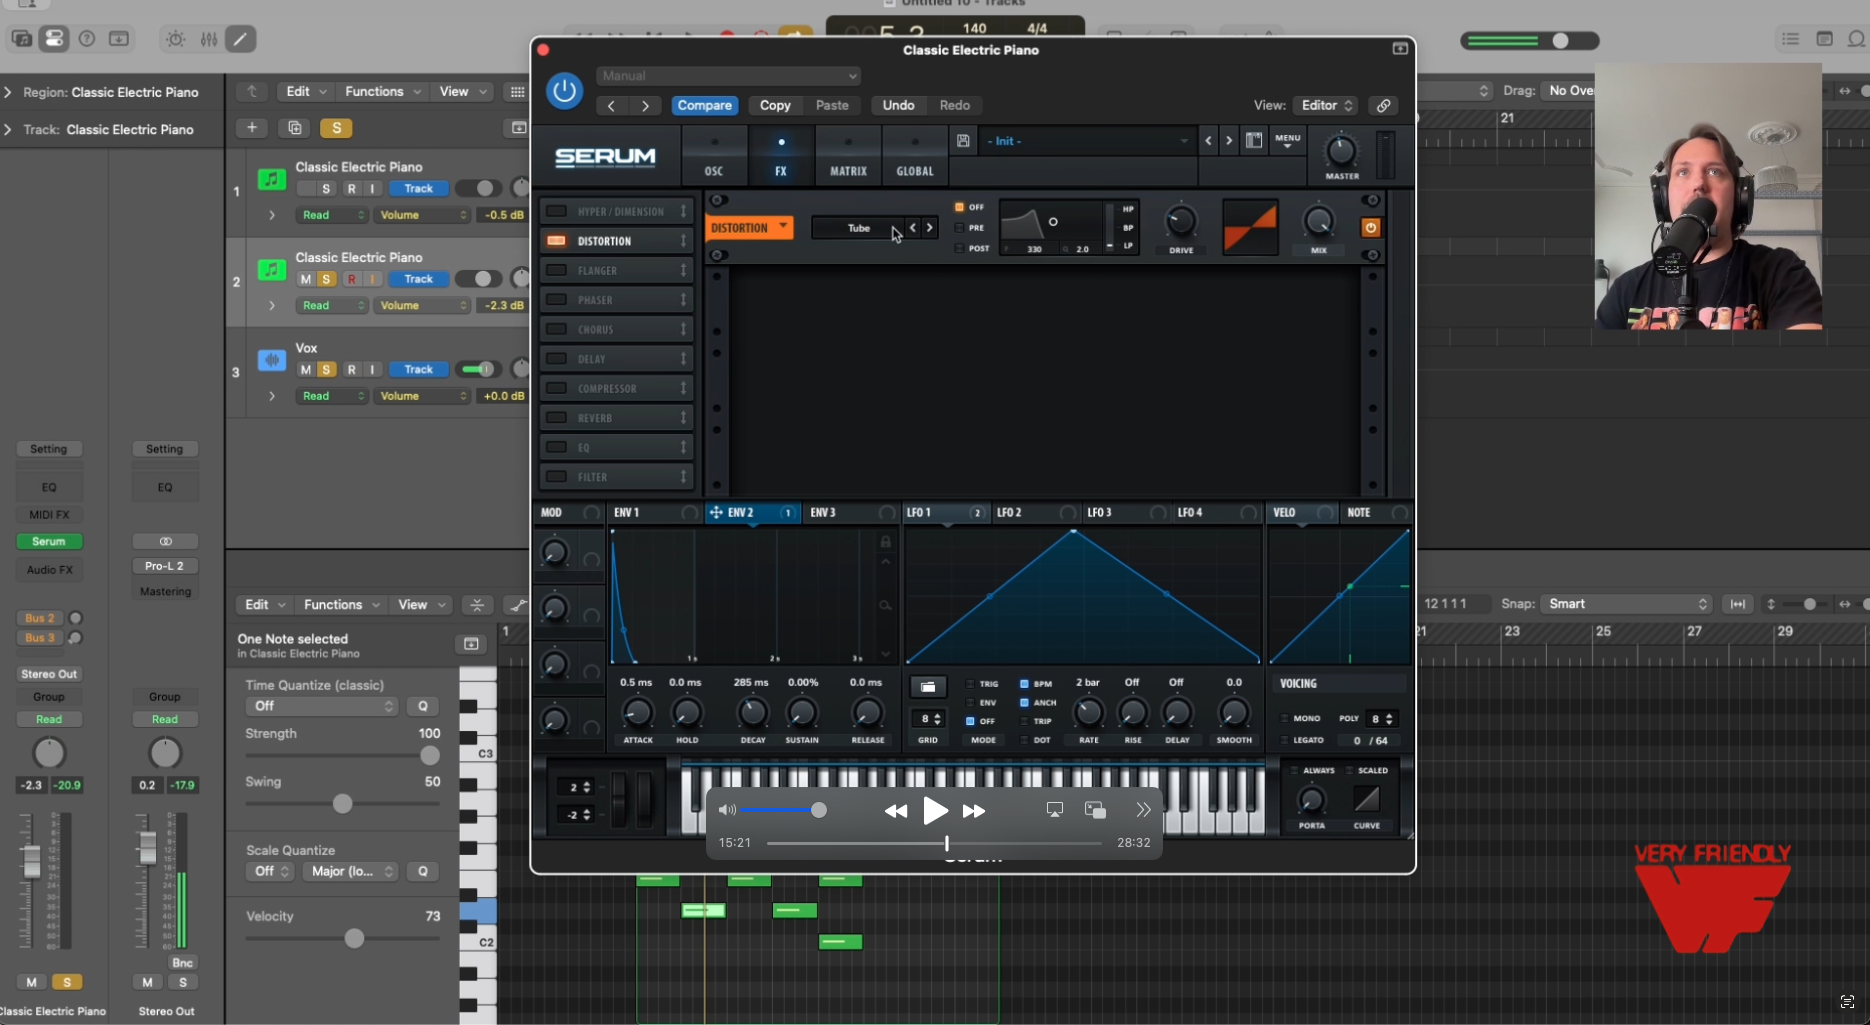
Use the Filter section's built-in drive knob, or click on the FX tab
Add a distortion effect in the FX tab (Tube or Tape modes work well for warmth)
Drive amount: 5–15% (you want warmth, not audible distortion)
Mix: 30–50%
External plugins (if you want more control):
Soundtoys Decapitator ($199) — five analog circuit models, our favorite
Blackbox HG-2 Tube Saturator ($30) - control over even and odd harmonics
Klanghelm IVGI (free) — simple and effective
Softube Saturation Knob (free) — one knob, no decisions
Focus saturation on the 200–500Hz range. That's where the warmth really lives.
5. Noise Layering
Analog circuits have noise floors that create interesting vintage-feeling sounds — tape hiss, circuit hum, electrical interference. Digital synths are silent, which removes the classic analog character.
In Serum:
Enable the Noise oscillator
Choose a noise type (White, Pink, or import vinyl crackle/tape hiss samples)
Level: Very low — around -17dB relative to your main oscillators
Process with a bandpass filter so it sits behind the sound, not on top of it
The goal is noise you feel more than hear. If it's obvious, you've gone too far.
6. The Juno Chorus (Critical for Pads)
The Roland Juno's lush pad sound comes almost entirely from its built-in chorus circuit, running at fixed rates of 0.4Hz and 0.6Hz. A single oscillator through this chorus sounds like an ensemble of voices.
In Serum: The built-in chorus works (under the same FX tab as the saturation), but for authentic Juno character, you should use TAL-Chorus-LX (free plugin). Set mix to 50% wet.
This single effect transforms thin digital pads into something that actually fills space.
Let's build your first synth patches from scratch together.
Recipe #1: Minimoog-Style Bass (5 Minutes)
The Minimoog bass sound — you've heard it on everything from Stevie Wonder to Parliament to Dr. Dre. Fat, punchy, with that distinctive filter sweep.
Oscillators:
Osc A: Basic Shapes → Square. Fine tune: 0 cents.
Osc B: Basic Shapes → Saw. Octave: -1 (one octave down). Fine tune: +9 cents.
Sub oscillator: On, one octave below Osc B.
Blend Osc A and B roughly 60/40.
Filter:
Type: MG Low 24
Cutoff: ~35% (around 1.2kHz)
Resonance: 35%
Filter envelope amount: 55%
Envelope: Attack 0ms, Decay 200ms, Sustain 20%, Release 100ms
Amp Envelope:
Attack: 0.05s (near-instant)
Decay: 300ms
Sustain: 40%
Release: 150ms
FX Chain:
Distortion: Tube mode, drive 15%, mix 30%
Compressor: Light ratio, fast attack
EQ: Cut below 30Hz, slight boost at 80Hz
Optional: Add the Hyper/Dimension expander for subtle width, or a low-pass at 8kHz in your EQ or Filter to tame harshness.
Recipe #2: Juno-Style Pad (5 Minutes)
The Juno pad sound — the lush, warm bed underneath synthwave, 80s pop, and most modern lo-fi. Wide and full without harsh edges.
Oscillators:
Osc A: Basic Shapes → Saw. Fine tune: 0 cents.
Osc B: Basic Shapes → Saw. Fine tune: +4 cents.
Unison: 2 voices on each oscillator, detune 10%.
Filter:
Type: Low-pass 12dB (any 12dB model)
Cutoff: ~25% (around 600Hz)
Resonance: 20%
Slow LFO → Cutoff at 5–10% depth for gentle movement (rate: 0.3Hz, NOT tempo-synced)
Amp Envelope:
Attack: 400ms (slow fade-in)
Decay: 1.5s
Sustain: 70%
Release: 2s (let it breathe)
FX Chain:
Chorus: TAL-Chorus-LX at 50% wet (external plugin), or Serum's Chorus/Flanger at moderate depth
Reverb: Hall or Plate, decay 2–3s, mix 25–35%
Delay: Optional, 1/8 note, low feedback, low mix
The chorus is doing most of the work here. Without it, this patch sounds thin. With it, it sounds like a $2,500 Juno-60.
Post-Synth Processing Overview
In general, these are the effects that will help you get that analog sound.
Subtractive EQ — High-pass at 30–80Hz to remove rumble (unless it's a sub-bass patch)
Saturation — Tube, tape, or transistor style. 1–3dB of gain into saturation, not more.
Compression — Opto-style (LA-2A emulations) with slow attack. Ratio 2:1–4:1. Glue, not squash.
Additive EQ — Boost 200–500Hz by 2–3dB for warmth. Gentle shelf cut above 10kHz.
Modulation FX — Chorus or ensemble, if not already on the patch.
Time-based FX — Delay, then reverb. Always last.
Tape emulation — Plugins like Softube Tape or RC-20 add subtle compression and saturation that glues everything together. This is our favorite.
Final Thought
Everything in this guide works. We've used these exact techniques on records and are using most of these concepts every day.
The difference between "almost analog" and "actually analog" is subtle enough that it only matters in specific contexts — solo'd synth tracks, audiophile listening, A/B comparisons.
In a full mix, with guitars and drums and vocals fighting for attention, a well-programmed Serum patch sits just fine next to the real thing. The listener isn't thinking about oscillator drift. They're thinking about whether the song hits.
Use these techniques to get your sounds 90% of the way there. Then finish the song.
Enjoy.